[1] Create the object you want to texture. Here I just created a random object which I will be unwrapping through this.

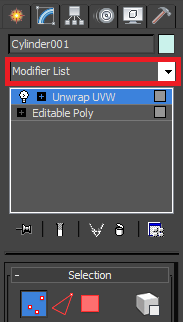
[2] On the side bar, just on the right, click the drop down menu which is at the top. Scroll down until you can see Unwrap UVW. This is how you tell the object that it’s done for some texturing.

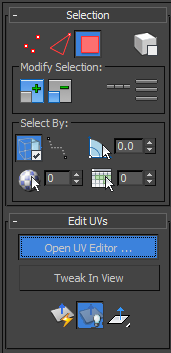
[3] After you have done that, select Unwrap UVW, and go to Selection and select Polygon. Scroll down the side bar again and find the button which says Open UV Editor.

[4] When you have clicked this, a new window will open with another stage, possibly a bunch of lines, and lots of options to choose from.

[5] Because the model you have made might be quite different from mine, I’ll just go over basics. I’m first going to start from the top. Pan your camera over the top of the shape and select all of the flat polygons you can see like I have done.

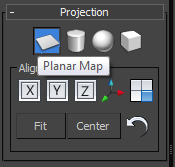
[6] Now, the right bar on the main stage, with the 3D model, scroll down the bar until you can see 4 little shapes under the tab Projection.
[7] With all your selections selected, click the flat plane one called Planar Map, and it should flatten out the flat areas of the shape into one single shape. That’s the first part done. Unselect Planar Map so that you can now move the shape which you have created.

[8] Now, pan the camera around to the bottom of the shape, select the bottom Polygons in which you can see, and do the same thing as you did with the top Polygons; Find the 4 shapes, click Planear Map, and unselect it. Move those shapes away from the center stage as well.
[9] Now to select the side Polygons. These ones do separately because there is a trick to them. Pan the camera to the side, select the Polygons that you need, and find the 4 Shapes again on the right menu.

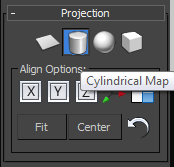
[10] Instead of selecting a Planar Map, this time, select Cylindrical Map. Anything which is round with a straight edge, it will pick up and flatten it.

[11] Unselect Cylindrical Map, move the newly created shape in the UVW Editor to an unoccupied space and move on to do the other sides which you can do with the Cylindrical Map.

[12] Now that you have done all of your UVW Mapping, create a box around the objects on the UVW stage and select all of the maps.

[13] Go to the top, click on Tools > Pack UV’s. When the prompt box appears, click okay, and it will sort out the UV Maps into place. This will control and compact the UVW maps into a single area where they will most likely fit.
[14] When that is done, and is all neat and tidy in the stage area, it’s time to render the UVW Template. This can be found in the same area: Tools > Render UVW Template.

[15] When you select this, a pop up prompt will appear. Change the Width to 1024, and the Height to 1024. When you click okay on this box, it will give you a nice big render of the UVW’s you have created.
[16] At the top of the render box, there is a little save icon, save the image with a name of your choice and as a .JPEG (this is the best file format). When you are done, open this into Photoshop.
![]()
[17] As the file is opened up in Photoshop, make sure the first thing you do is press CTRL and I to invert the images appearance. This gives it a white background instead of black, and you can see the Mapping lines way better.

[18] In the layers column, double click the Background Layer (which is the layer the UVW map is on) and a prompt will appear. Click OK on that, and it will make it an editable layer. Create two new layers, one of them paint White, and place them both behind the main layer which is with the UVW Map. Last but not least, on the drop down box, whilst the UVW map layer is selected, change this to Multiply.

[19] Now, on the layer in the middle, you can add your textures on this layer, which makes things much easier because you’re not overlapping certain areas of the UVW map. Choose your own layers or colours which you want to colour in your object with.

[20] When you are done, and ready to save your texturing, go back to the first layer, with the UVW Map on it. Click the eye which is next to the image and this will hide the lines of the UVW Map guideline. Save the image again as a .JPEG.

[21] Float back to 3DS Max, and look at the top bar of the window. There is a little sphere, checker patterned, with a box next to it. This is the material editor.

[22] The window may come up very weird like, and not like the way mine did, but if you click on Modes at the top of the newly opened window, and select Compact Material Editor, it should look something like this.

[23] In this window, you can see the tab Maps. Click this and a new menu will unfold. From here, look down the list until you can see Diffuse Colour. Click None next to Diffuse Colour and it will open a new window. When that opens, select Bitmap. When you have, press OK.
[24] Again, this will open up a new window where you can select the texture which you just made for your Object. Scroll and select what you have made and then it will add it to the Diffuse Colour. When you have done that, click and drag your new texture, by the image above, and place it onto your object. To see the texture, go back to the texture panel and select Show Shaded Material in Viewport.

[25] Now you can render this, by clicking on the render button at the top of the main stage called Render Production. You are now done with texturing and rendering your object.

[26] You can also add in lights to give more of a shadowy effect. Remember to always turn on shadows.


Leave a comment