[RESEARCH] What Sounds Mean to Us in Games – Nostalgia?

In any game, you can be surprised by the many sounds that you are greeted with. When you go back and replay that game, you are then greeted with a slight Nostalgia, as you catch yourself humming to the tune of the track which is playing. Or, you can even find yourself imitating certain feedback sounds as you progress further into the game.
Take Super Mario World for example; it’s an iconic game, and everyone knows it, even if they have not played it. This could go for any game, especially like Space Invaders, Pokemon or any game which has been hyped over years by many fans. It makes the game’s music and noises noticeable, even through sheer lack of understanding, it’s only unique to that game, making you realize straight away what game it has come from. Music is an emotional trigger which could put us in a different mood just by playing a certain clip, not just that but if it all goes with the visuals, it makes you feel drawn in, like you’re in the game itself. However, if the music was gory, horrible, and really for a horror game, and it plays whilst cute little bunnies are on the screen, the player is then brought out of that scene and they begin to question why this music was chosen for this scene (almost like breaking the 4th wall).
But it doesn’t have to be about the feeling it gives us, it could also play on our understanding of the world around. If you hear a horn in the game, you could think of a car horn, or a boat horn. Depending on the pitch, or the way it is presented, there are many ways which a horn could represent something else we know in real life. Which is why sounds in games are fascinating, because they relate to the player and grants feedback, showing them that this is what it is, and this is what you think it is, just by listening to it.
Sounds are important, I feel, and they give so much to us, even if we don’t see it. That emotional response from the player to the character that is on the screen couldn’t have been created if it wasn’t for the music which plays along with it, or the sounds in which trigger sequences or events.

[DEVELOPMENT] Story Board for the Cut Scene

Bonnie_Simpson_Cutscene_Storyboard

Here you can see my storyboard for the starting cut scene of my game. I tried to make it as short as possible, so the player understands quickly what the game is all about. Here, you can see I had made short notes which resemble the happenings in the images themselves, and what sounds or noises which could be made from each movement, or part of the scenery.
The whole point of the beginning cut scene is to immerse the player into a realization of the world they have been introduced into. Quite like Logan’s Run, where the world is being controlled by the man, by the machines which contain their life span, but instead, the machines are inside the humans as nano-machines.

[NOTES] Creating an Hourglass in 3DS Max

[1] Start off with a Cylinder. Change the Parameters: Radius to 20.0, Height to 100.0, Height Segments to 10 and Sides to 20.

[2] Right click the object itself, and Convert To > Editable Poly. This will make the object editable. From here, go to the right side menu and choose Polygon Selection from the Selection tab.

[3] Go down and open the tab which says Soft Selection. Tick the box which says Use Soft Selection and change the Fall Off amount to 20.

[4] Begin to select the middle Polygons of the Cylinder itself, this will start to make a rainbow effect on the splines. This is where the shape will draw in when you start pulling it in with the scale tool.

[5] Select the scale tool, after selecting the middle Polygons, and scale down using the mid section of the scale. This will draw in the mid section of the hourglass itself.

Untitled
[6] Make another cylinder, this time change the parameters: Width to 25.0, Height to -5.0, and Height Segments to 1.0.

[7] Hold down shift and use the Move Tool to move and copy the cylinder shape which you have made and move that on top of the hour glass object.

[8] Make sure to move the cylinders into place. This will make the top and bottom rests for the hour glass to stand on.

Untitled
[9] Create another Cylinder. Change the parameters: Radius to 1.5, Height to 103.0, and Sides to 10. This will be used to hold up the stands, and keep the glass in place in the middle.

[10] Shift click, and add two more away from the original that you have created. This feels like it gives more character to the hourglass itself.

Untitled
[11] Select the top stand, right click it and Convert To > Editable Polygon. We are going to add more detail to the top.

[12] Select the top polygon of the Cylinder. Right click, and select the black box which is next to Inset. Change the amount to 2.0, this will give the object another polygon in the middle of the top half.

[13] Right click again, with the newly made polygon selected, and press the black box next to Extrude. Change the total amount to 2.0. Repeat and do the same for the bottom Cylinder.

Untitled
[14] The Hourglass is now complete! Do the UVW Maps, and texture them. When you have done that, apply your textures to the assigned areas.

Untitled

[15] Don’t forget to add the light source, to give more of a realistic touch to the object.

HourGlassRender

EXTRA – How to make a Glass Texture

[16] However, for the glass itself, you can create a Glass texture which can make it seem more believable. Open up the Material Editor at the top of the main stage.

Untitled
[17] As the window opens, make sure to go to Modes and change it to Compact Material Editor. When that is done, look down and find the Specular Highlights tab. Change them: Specular Level to 160 and Glossiness to 30.

Untitled

[18] When you have done that, find and open the Maps tab. Scroll down and find Refraction, click on the button that says None. When the new window pops up, find Raytrace.

Untitled
[19] Now apply the texture to your Glass, and render it. You will now see that the glass is now invisible, and looks very much like glass!

Untitled

[NOTES] How to Simply Unwrap a UVW on an Object in 3DS Max

[1] Create the object you want to texture. Here I just created a random object which I will be unwrapping through this.

Untitled
[2] On the side bar, just on the right, click the drop down menu which is at the top. Scroll down until you can see Unwrap UVW. This is how you tell the object that it’s done for some texturing.

Untitled
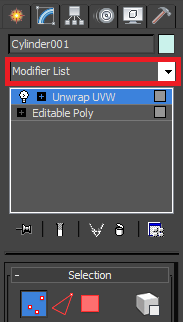
[3] After you have done that, select Unwrap UVW, and go to Selection and select Polygon. Scroll down the side bar again and find the button which says Open UV Editor.

Untitled
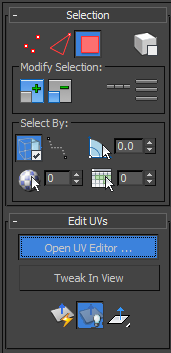
[4] When you have clicked this, a new window will open with another stage, possibly a bunch of lines, and lots of options to choose from.

Untitled
[5] Because the model you have made might be quite different from mine, I’ll just go over basics. I’m first going to start from the top. Pan your camera over the top of the shape and select all of the flat polygons you can see like I have done.

Untitled
[6] Now, the right bar on the main stage, with the 3D model, scroll down the bar until you can see 4 little shapes under the tab Projection.

Untitled


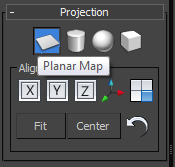
[7] With all your selections selected, click the flat plane one called Planar Map, and it should flatten out the flat areas of the shape into one single shape. That’s the first part done. Unselect Planar Map so that you can now move the shape which you have created.

Untitled
[8] Now, pan the camera around to the bottom of the shape, select the bottom Polygons in which you can see, and do the same thing as you did with the top Polygons; Find the 4 shapes, click Planear Map, and unselect it. Move those shapes away from the center stage as well.

Untitled

[9] Now to select the side Polygons. These ones do separately because there is a trick to them. Pan the camera to the side, select the Polygons that you need, and find the 4 Shapes again on the right menu.

Untitled
[10] Instead of selecting a Planar Map, this time, select Cylindrical Map. Anything which is round with a straight edge, it will pick up and flatten it.

Untitled
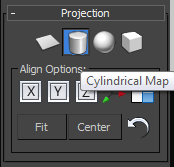
[11] Unselect Cylindrical Map, move the newly created shape in the UVW Editor to an unoccupied space and move on to do the other sides which you can do with the Cylindrical Map.

Untitled
[12] Now that you have done all of your UVW Mapping, create a box around the objects on the UVW stage and select all of the maps.

Untitled
[13] Go to the top, click on Tools > Pack UV’s. When the prompt box appears, click okay, and it will sort out the UV Maps into place. This will control and compact the UVW maps into a single area where they will most likely fit.

Untitled

[14] When that is done, and is all neat and tidy in the stage area, it’s time to render the UVW Template. This can be found in the same area: Tools > Render UVW Template.

Untitled
[15] When you select this, a pop up prompt will appear. Change the Width to 1024, and the Height to 1024. When you click okay on this box, it will give you a nice big render of the UVW’s you have created.

Untitled

[16] At the top of the render box, there is a little save icon, save the image with a name of your choice and as a .JPEG (this is the best file format). When you are done, open this into Photoshop.

Untitled
[17] As the file is opened up in Photoshop, make sure the first thing you do is press CTRL and I to invert the images appearance. This gives it a white background instead of black, and you can see the Mapping lines way better.

Untitled
[18] In the layers column, double click the Background Layer (which is the layer the UVW map is on) and a prompt will appear. Click OK on that, and it will make it an editable layer. Create two new layers, one of them paint White, and place them both behind the main layer which is with the UVW Map. Last but not least, on the drop down box, whilst the UVW map layer is selected, change this to Multiply.

Untitled
[19] Now, on the layer in the middle, you can add your textures on this layer, which makes things much easier because you’re not overlapping certain areas of the UVW map. Choose your own layers or colours which you want to colour in your object with.

Untitled
[20] When you are done, and ready to save your texturing, go back to the first layer, with the UVW Map on it. Click the eye which is next to the image and this will hide the lines of the UVW Map guideline. Save the image again as a .JPEG.

Untitled
[21] Float back to 3DS Max, and look at the top bar of the window. There is a little sphere, checker patterned, with a box next to it. This is the material editor.

Untitled
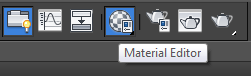
[22] The window may come up very weird like, and not like the way mine did, but if you click on Modes at the top of the newly opened window, and select Compact Material Editor, it should look something like this.

Untitled
[23] In this window, you can see the tab Maps. Click this and a new menu will unfold. From here, look down the list until you can see Diffuse Colour. Click None next to Diffuse Colour and it will open a new window. When that opens, select Bitmap. When you have, press OK.

Untitled

[24] Again, this will open up a new window where you can select the texture which you just made for your Object. Scroll and select what you have made and then it will add it to the Diffuse Colour. When you have done that, click and drag your new texture, by the image above, and place it onto your object. To see the texture, go back to the texture panel and select Show Shaded Material in Viewport.

Untitled
[25] Now you can render this, by clicking on the render button at the top of the main stage called Render  Production. You are now done with texturing and rendering your object.

Untitled
[26] You can also add in lights to give more of a shadowy effect. Remember to always turn on shadows.

Untitled
Untitled

[NOTES] Creating a Bowl in 3DS Max

[1] Make a cylinder on the stage and change the Parameters: Radius to 40.0, Height to 35.0, Height Segments to 1.0, and Sides to 14.0. This will make a nice start to creating a bowl shape.

[2] Right click the cylinder and go to Convert To > Editable Poly. This will make the object more editable as stages progress.

[3] In the selection option, select Polygon and click on the bottom polygon. From here, select the scale tool at the top of the program and scale down the size of the bottom polygon. This creates a dip for the bowl itself.

[4] Move to the top Polygon, right click, and click the little box next to Insert. Change the amount to 1.0. This will create a new polygon inside the middle.

[5] Select the new polygon, right click, and click the little black box next to Bevel. Here, change the Height to -25.0 and Outline to -13.0.

Untitled
[6] With the Polygon Selection tool still active, go around the Polygons which are inside the bowl and apply a Smoothing Group, which is at the bottom of the right bar, which will give a nice smooth edge for the bowl.

[7] Click the bottom of the bowl Polygon, right click, and select the little black box next to Inset. Change the amount to 2.0. Right click again after pressing OK for the Inset, click the little black box next to Extrude and change that amount to -1.0.

[8] Flip down to the bottom of the bowl, select the bottom Polygon of the object, right click and select the black box next to Inset. Again, change the amount to 2.0. Press okay, right click again, press the black box next to Extrude. Change the amount to 1.0.

Untitled
[9] Quick and simple! Apply UVW mapping and unwrap the textures which are needed to give the bowl some colour, or interesting features.

Untitled

[10] After creating textures in Photoshop and applying them to the object, you have now finished the bowl itself.

BowlRender

[NOTES] Creating a Hook in 3DS Max

[1] First you begin with a basic cylinder, with the parameters as follows: Radius to 10.0, Height to 60.0, and Sides to 12.0. This will make a low poly rounded cylinder which will be used as a handle.

[2] Right click the model you have just made and go Convert To > Editable Poly. This will make the object ready to change as much as you would like to.

[3] On the top polygon, with Polygon selected under the Selection side bar (right side), select it and right click, scroll down and click the little black box next to Extrude.

[4] When the prompt comes up, change the amount to 4.0, giving you an extra base to work with to create the handle top. Click okay and the model should now have an extra extruded part.

Untitled
[5] When that is done select the side polygons of the newly formed extension to the handle itself, click around until all of the polygons around that edge are selected. Right click the object again and select the little black box next to Extrude.

[6] Now, this time, as the prompt pops up, you should see that the selection you have made has gone to the side slightly. You can change this by clicking the drop menu and changing it to Local Normal. This enables the polygons to sprout outwards rather then all over the place like it previously was. Then, change the Amount to 5.0 and click OK.

[7] Select the side polygons again, around the brim of the newly formed handle top, and scroll down the right menu until you find a part which says Polygon: Smoothing Groups. Here, if you click on a number which is already not used by another object in the scene, it will smooth out the edge, rather then keeping the object jagged like it was before.

Untitled
[8] Go back to the right menu and scroll up to the top. There is a little tab which will say Soft Selection (tick the box which says Soft Selection). Click onto that and it will cause your objects spines to become rainbow coloured. This is to indicate that Soft Selection is on. Change the Pinch to -1.0.

[9] Select the middle Polygons inside the middle of the handle itself. Here is where the soft selection will pull in the most, making a gorgeous indent into the handle. When you have done that, go up and select the Scale tool, with the middle polygons selected, scale down the middle as much as you prefer. Untick Use Soft Selection when you are done.

Untitled

[10] Click the middle-top Polygon on the top of the handle itself. Right click and click the black box next to Inset. Change the amount to 7.5, and it will shrink the inner circle down.

[11] Right click again, still with the inner circle selected, click the black box next to Extrude. Change the amount to 70.0. This is now starting the base for the hook itself.

[12] On the bottom right of the screen, click Maximize Viewport Toggle and change the screen to frontal view. Now, from the side bar, click on the small Sun and click onto Shapes. Choose Arc and create an arc which leads from the top of the new extrude you have just made.

Untitled
[13] Go back to Maximize Viewport Toggle and change it back to Perspective view. Select the top polygon from the long stem which you created from the previous extrude. Click the black box next to Extrude along Spline.

[14] Change the following things: Segments to 8.0, Taper Amount to 0.0, Taper Curve to 0.0, and Twist to 0.0. This will keep the curve the same radius as the original Extrude.

[15] Again, go back to the Maximise Viewport Toggle and go to Front view. Create another spline by going to the spline selection again. This time, use Line; Line generates a lovely flick at the end if used correctly, or you can keep the hook like it is.

Untitled
[16] Go back to Perspective view. Select the polygon which followed through the arc, right click and click the small black box next to Extrude with Spline again. Keep all of the numbers as they are, but change segments to 10, rather then 8, giving the hook end more of a curve.

[17] When that is done, it’s time to focus on the handle once more to give it some final touches. Select the bottom polygon, right click and click the box next to Inset. In Inset, change the amount to 1.0.

[18] After, click the newly made Polygon and right click. Click onto the little black box next to Bevel and change the amount to 1.0. Select the polygons around the polygon in the middle, the select the middle polygon, go to Smoothing Groups and smooth out the polygons around to give a round end.

Untitled
[19] Now that the model is finally finished, it’s time to UVW Unwrap the object and begin texturing the maps.

HookRender

[NOTES] Creating a Bridge in 3DS Max

[1] Create a cube from the Create button at the right of the screen. Change its height to 35cm, width and length to 5cm. This will make a perfect widget for the bridge fence. When that is finished, right click the object; Convert To > Editable Poly.

[2] Now we can add more details to it. On the right bar, select Modify from the top and then click on the square shape (Polygon) to then start adding more polygons into the shape. As you do this, select one of the sides with the left click and right click the selected polygon; click the little box next to Inset. Now, when the prompt appears, change the amount to 0.7.

[3] Go to the bottom right corner and click onto the Maximise Viewpoint Toggle and this will bring up the few screens. Select one which really views your selected side perfectly and go into it by clicking on the screen and pressing Maximise Viewpoint Toggle again.

[4] Right click the shape, whilst still in Polygon mode, and select Cut from the menu. Now, create two new boxes in the middle of the Inset which was made, and this will be the connection to each pillar on the fence. (Now come out of the Viewpoint you are in and back into Perspective mode.

[5] When these extra boxes are made, and moved to where is preferably good for your creation (you can do this by selecting the Edge mode in the bar on the right. Then using the move tool to move them to areas), whilst in Polygon mode, select both boxes, right click and use the little box next to Extrude. Change the height in the prompt to 20.

Untitled

[6] Now that you have one pillar with supports done, now it’s time to shift-click onto the object (whilst Element is selected on the right bar) and move the copy across and place it onto the end of the support beams. Keep repeating until you have something which you like.

[7] You have done the side, select all the shapes, shift-click again and drag across to make another side of the bridge supports.

[8] Because we haven’t made the ending of the bridge supports, create another pillar (which we will shift-click and add to the other side afterwards) using the same measurements as the other pillars, add that onto the end of the fence.

[9] The walk way can also just be made from a cube. Create another cube and now change its shape by replacing the Length by 23cm, Width by 65cm and the Height to 2cm. This will create a plank. Add this between two support beams, making sure that the plank is just near the middle of the beams.

[10] Before changing these planks into a Editable Poly, the two end wooden planks need to be shrunk down. Select one of them and change the Length to 15cm and move the object a little closer to the other plank which will create a walk way perfectly fit for the object.

Untitled

[11] All we need to do now is make it look a little fancier. For each pillar we are going to at spikes which will then ‘dig’ into the ground as support. Click onto the bottom of one of the pillars, with Polygon selected on the right, right click and select the box next to Inset. Change the amount to 0.5. Now, do this for each pillar you feel needs it.

[12] When you have done that for each pillar you would like extra on, now start to extrude each one by clicking on the middle Polygon, whilst having Polygon selected on the right bar, right click and click the box next to Extrude. Change the Height to 10 for each one.

Untitled

[13] Make a sphere, Radius 4 and 8 Segments. This is a great low poly sphere which will be placed on top of each of the pillars. Place them on two opposite pillars, shift click and move by the axis so that they align.

[14] Now, start to UVW Unwrap all of the shapes, and the spheres as well, maybe choose a wooden texture to go with it and apply the textures to the body.

BridgeRender

[NOTES] Creating a Sign on 3DS Max

[1] You start off with a simple spline for the sign. Go to the side bar, click on the Shape tab and select Line. From here, go to the bottom of the page where you can change your Viewport and change it to Front.

[2] When you have selected Line, on the top bar, click Snaps Toggle which will enable the line to snap on the axis provided on the stage. Now, draw a box or something which can resemble a sign with the snap toggle on.

[3] After you have closed the spline, go back down to choosing the Viewport and go back to Perspective view. This will still show your spline that you have created.

Untitled

[4] Right click onto that spline and Convert To > Editable Poly. This will create a shape on the inside of the frame, which will now give you something to edit.

[5] When the Editable Poly has been enforced, right click again and click the black box next to Extrude. Change the amount to 9.0, this will give depth to the shape. After that is done, go back to the bar on the side and select Boarder instead of Polygon. Grab the boarder which doesn’t have a capped polygon and scroll down to Edit Boarder > Cap. This will cap the shape with a polygon.

[6] Change the selection point back to Polygon (from Boarder) and select the two face polygons of the sign. Right click and click the black box next to Inset. Change the amount to 1.0, if it isn’t already and click okay. This will give the sign an edge.

[7] Again, select the polygon’s in the middle of the inset area, right click and click the black box next to Extrude. Change the amount to -1.0. This will give the shape a slight indent in the middle of the sign.

[8] The sign is now complete. Create a new cube, select the cube and draw it onto the scene. Go to the side bar and start changing the parameters to: Length to 5.0, Width to 35.0, Height to 4.0. Move this block to the top of the sign, this will work as a hanger.

Untitled

[9] Go back to create again, as the hanger is complete, you need metal hooks which keep it suspended. Create a Torus, change the parameters to: Radius 1 to 55.0, Radius 2 to 6.0, Segments to 20, and Sides to 8.0. This will keep a low poly but still rounded circle.

[10] Right click and turn it into an Editable Poly, and find where the half way mark is on the shape. Grab the select Polygon tool and delete the other half of the doughnut shape giving you a slight semi-circle.

[11] Click on Element in the selection panel on the right and click on your new shape. Change the tool to a scale tool and start scaling the loop down to about the size in which it will fit. Here, you have your hooks. You can add two to give it more believability.

Untitled
[12] Create another cube, last cube this time, change the Parameters: Length to 7.0, Width to 100.0, and Height to 9.0. When you are done, right click and change it into an editable Polygon. Move the creation up and over the hooks, make sure it is touching the hooks.

[13] On one side, by selecting the Polygon at the end, right click and click the box beside Bevel. Change the amount to 1.0, which will give a nice round off at the end.

[14] At the other end, select polygon, and right click. Scroll down to Inset and click the black box beside, change the amount to 1.0. Afterwards, click on the new polygon in the middle, right click and click the box beside extrude. Change the amount to 10.0.

Untitled
[15] The sign is now finally complete. Select every shape and start UVW Unwrapping the object. When you are done, import the blueprints to Photoshop or another software in which you feel confident in, and start adding textures. Then begin to apply textures to model.

SignRender

[NOTES] Making a simple Bird Bath in 3DS Max

[1] Make a Cylinder. Change the Parameters as follows: Radius to 9.0, height to 1.0, height segments to 1.0, and sides to 10. After placing these changes onto the cylinder itself, right click it and Convert To > Editable Poly.

[2] Under Selection on the right bar, change the selection areas to Polygons. When you have done that, click the top of the cylinder to select the top polygon.

[3] Right click again, making sure it’s still on Polygon selection, and scroll down to Inset. Click the little black box which is to the side of the text. Change the Amount to 1.0.

[4] Re-select the move tool from the top bar in the program, and move the axis down slightly, giving off a dip look to, what will be, the base of the Bird Bath.

[5] You then select the Polygon in the middle, right click and select the black box again next to Inset, change the amount to 4.5.

[6] Grab the polygon in the middle again, and right click. This time we’ll need to extrude this polygon, upwards. Scroll to Extrude, click the black box, and change the amount to 18.0.

Untitled
[7] After doing the base, it’s now time to do the bowl. Create another Cylinder and change the parameters to: Radius to 14.0, height to 1.5, height segments to 1.0, sides to 10.0.

[8] Right click onto the newly made cylinder and Covert To > Editable Poly. Select the Polygon selection tool again and select the top part of the cylinder.

[9] Right click the shape, click the black box next to Inset and change the amount to 0.5. Flip over to the bottom and select the polygon underneath the shape, right click and scroll down to Bevel and click the black box next to it. Change the height of the bevel to 1.0.

[10] Go back to the top of the shape again, select the middle Polygon. Bevel this downwards by right clicking, selecting the black box next to bevel, and change the height to 1.5.

[11] Select the middle polygon again, right click and select the black box inset, change the amount to 7.0. Then, select that polygon in the middle and do an extrude. Click the black box next to extrude, and change the amount to -0.7.

Untitled
[12] Now begin UWV Unwrapping the object. Creating some textures for both sides of the bird bath. When you are done, apply the textures and render.

Untitled

[13] After doing all the texturing in Photopshop and adding a few tweaks to your leisure, I decided on the marble effect on my Bird Bath. This is the finished Render.

BirdBathRender

[RESEARCH] The Others and the Theories of Post-Colonialism

Colonial Possession around the World

Colonial Possession means what part of the world does a certain colony have (Word Reference, Colonial, 2013). Maybe through influence or alliance, there is no certainty by how these possessions were made, only by utter power. Because of these places being taken around the world, influences are slightly different from other colonies. Certain laws will be slightly different, and the way the areas surrounding it will be maned is completely up to the people in power. Which is why there’s such a big difference between many countries regarding this fact; depending on whom is running your country, really influences the way people live and run in the country.

Post-Colonialism is the interaction between both European union and the areas in which they have populated, communicating different ways in which time lines and other facts and opinions really went down in history.

Historical Rewriting and Change of Beliefs

Because of the way people have re-colonised many areas around the world, history or hearsay facts about that certain country gets passed down for generations upon generations. It’s crazy how something so little can collide to create something so big, so fascinating to others that they begin to believe and understand it as a true fact. Because European influences has become so strong over the years is because of a domination in world culture as we know it today.
There is more change then meets the eye, as some countries tell children at a very young age, or even adults through the media (news stories and other story telling genres) show different scenarios in the world, and how it is prevented and changed for the good of all man-kind. But in reality, the media feeds the public by sugar coating their stories to make others sound good or bad, depending on where about in the world they are. If a person carries a certain profession (ex. Customer Assistant) they will label the person just like their own profession (this goes for race, gender and even religion differences).
Years and years ago, these beliefs in culture or news stories around the world were different from those today. Possibly the impact of sudden change around the world (such as wars) or even agreements from people high in power may have been different, and give people a completely different opinion based on those options. It becomes a talking point, which is why the media around the world is so world wide, and everyone takes on this information as fact.

Change in Cultural Desires

Holidays are used for a time of relaxation and learning more about the world around you. However, for some holiday makers, they find it hard to get by without seeing something which strikes their own eyes as familiar. 
For example, McDonalds, an American company which has many branches around the world (over 33,000 restaurants (About.com, Number of McDonalds Restaurants, 2012)) are best known for their fast-food making techniques and gorgeously tasting food which is fit for any one with a rumbley tummy. That said, there is no way you can go some where in the world and not actually find a McDonalds in the area, because the food has become so iconic that it’s what children and adults crave. So if holiday makers are scared about tasting the food of the country they are in, they are familiarised with fast food restaurants which are built to keep tourists from complaining. Could we then say that McDonalds has slightly taken over the world with their own iconic meals? If everyone knows it, they’re comforted by it, knowing what it smells and tastes like, with their own opinion made. This then breaks the bond between orientalism and their own cultural standards, keeping their wallets and experiences safe with giving them the know how. Unlike Chinese Restaurants, Indian Take-Away’s and Sushi bars, it’s all very different. Even to today’s cultures on the west side of the world, trying these foods and exploring the oriental difference, it’s not all for every one, which is why fast food places like McDonalds, KFC and Subway exists.

Is Cultural Influences Really Bad?

Many cultures change for the better/worse, but as this happens, everything else begins to change along with it. This is because anything that changes has a slight domino effect on everything else relating to it. Some cultures suffer because of this, and become an outcast in which people believe that they are wrong and they shouldn’t have anything to do with the Others.

A war which happened ages ago, still spoken and debated about today.

The Others is a term which is used for another culture that isn’t their own, which is exotic and not familiar with what is already known by that culture. Normally, the term Other is used for people lower then themselves, thinking less of them, treating them as a thing rather then a full being.
The Swastika (About.com, History of the Swastika, 2013) from the Nazi’s icon was originally a sign for peace. As they changed it to become a symbol of power and war, to represent them in battle, it has never been seen so lightly ever again. What I was talking about before was the domino effect, and this is a great example of it. If a faction takes influence by another, that significant other then becomes part of them. What ever that faction decides to do with that ‘other’ is then related to both parties, creating a single entity.

On the other side of the argument, sometimes change is a turn for the better. Artistically, Asia has a unique style of artwork called Anime/Manga. The east, so oriental and calm, beautiful and simplistic, influences the west slightly, and decide to take it on for themselves. Many artists now on the west side of the world have taken on the style of Anime/Manga because the style appeals to them in many ways.

tumblr_m5xovvA6ik1r6h6oio1_500

A beautiful Anime styled artwork of a girl playing guitar.

Yet its still symbolised as an eastern thing, which brings speculation to account, as others want to learn more and more about the artwork produced by Asian cultures. So sometimes it can bring interest in the right way for many western cultures because they become familiarised by the content of the eastern, giving them more attention, and others more aware of how their culture is like.